Capitalism & Meritocracy vs Communism/Socialism/Bernie & the Squad
So, just to level set, I come from a military family. I’ve had family members in the military going back multiple generations for over 100+ years. As a result, when I see and hear sitting members of Congress, like Senator Bernie Sanders and a ‘squad’ of House members, espousing the merits of socialism, communism, and Marxism or declaring that the principles associated with these various forms of government and repression just haven’t been implemented correctly, it truly causes me to seethe and see red. Granted, my family, and the families of millions of Americans have fought for this country just so we can preserve the right of some to say stupid stuff, but it still causes me to pause and take a few deep breaths before speaking.
What these Congressional members fail to recognize and understand is that, for better or worse, the United States, even with all of its faults, is a Constitutional Republic employing a mixed market capitalist economy that is a meritocracy at its core. In simple terms, meritocracy is the idea that people get ahead based on their own accomplishments rather than, for example, on their parents' social class. This is the heart of the “American Dream” that members of Congress seem hell bent on destroying all in the name of some demented understanding of the words ‘fairness’ and ‘equity.’
With the exception of one ‘squad’ member, all are natural born United States citizens. The one that is not is now a naturalized citizen who previously hailed from a highly corrupt east-African hell-hole known as Somalia. Even that nation defines its form of government as a ‘Federal Parliamentary Republic.’ Therefore, none of these members of Congress have EVER lived under the oppressive yoke of communism, socialism, or Marxism. But yet, they want to trash the country that has literally provided them with everything like multiple homes, flush bank accounts, full closets, refrigerators, and freezers, a peaceful night’s sleep without fear of being charged with insider trading, a robust retirement package, and access to a gold plated Cadillac healthcare plan that the rest of the citizenry pay for but do not have access to. In spite of all of these ‘perks’ of being a U.S. citizen and a sitting member of its Congressional body, they still want to push and cajole us to move toward one of these forms of government. A form of government, mind you, which has never worked by any degree or measure in any country where it was implemented. How’s Venezuela doing these days? How’s Cuba doing after 70+ years of communism? What’s the life expectancy in North Korea again?
Senator Sanders points to his beloved Scandinavian countries as examples of where socialism has worked. Unfortunately for the Senator, the very countries he’s pointing to (Norway, Sweden, and Finland) have publicly rebuffed him and his assertions and declared, ‘we are not a socialist country.’ It’s shocking to me, and perhaps it shouldn’t be, that none of these ‘progressive’ members of Congress remembers, or at a minimum read about, this:

That’s a picture that was taken of Boris Yeltsin before he replaced Mikhail Gorbachev while he was visiting a Texas grocery store in Houston in 1989. Here’s the thing. All of the Soviet Premiere’s and members of the Politburo knew that capitalism was a better economic engine than the strict state control’s inherent to communism. They knew that if the Soviet people saw what they themselves had seen throughout the world for 50 years, their grip on power and leadership would falter and collapse. And it did. Just two years after this picture was taken, the Soviet Union ceased to exist.
Day-in and day-out we see and hear Congress members as well as has-been celebrities and athletes promoting one of these despicable forms of government. They never just come out and declare “I love socialism,’ or ‘socialism is good and that’s what we need,’ but they ARE making these very statements through their actions. A good example of this is when they distance themselves from supporting the Cuban and Venezuelan people. These people are actively trying to make a positive change, toward freedom of all things, and these ‘progressives’ won’t give them the time of day. They openly rebuff any course correction out of socialism, communism, and state control toward capitalism, democracy, and free markets when they wear certain things like Fidel Castro or Che Guevara t-shirts. They continue their blind obedience to the brain washing and radicalization when they don’t speak out about products that they are approached to endorse. Instead, all they see, or saw, are dollar signs, a lot of dollar signs. So, they inked their name to that contract, jammed their fingers in their ears, and then put on horse blinders. To them, status and cash in the bank is more important than the conditions and labor practices where the products they endorse are manufactured, namely Asian sweatshops by children.
If you dig and look, you’ll notice some interesting things about protestors opposing their governments today. First off, if they aren’t actively being hunted, detained, disappeared, or shot, they can be found chanting and cheering for change while waving American flags. That’s right, AMERICAN FLAGS! They are waving those for a multitude of reasons.
In my opinion, however, I believe the primary reason they are waving those flags is to to garner support from the United States government itself. They want the U.S. military to swoop in and depose/topple their government because it is not fair, it is not equitable. It is corrupt to the core and they likely voted for it in some form or another and then it went off the rails. This is a typical and historical path. Socialism is usually voted into existence piece by piece over time until it consumes everything it its path and you have to shoot your way out of it. Communism is usually installed via revolution (Russia, China, Cuba, Vietnam, and Cambodia (which is a puppet democracy)).
Returning to the topic of the protestors now, Senator Sanders and the ‘squad’ are choosing to ignore them because they want oppression. They want divisive and distinct social classes full of have’s and have not’s. They want subservience to and dependency on the government. They want the government to control everything about a country’s economy. Of course they never come out and say this directly, but when they don’t publicly voice SUPPORT for the protestors they ARE saying all of the above. Those that choose not to protest vocally in these countries are choosing to flee. How many flotillas have arrived on our shores from Cuba in the last 50 years? That’s a number likely in the thousands. Now, how many flotillas have returned to that island disaster carrying U.S. citizens that have chosen to live under its ‘Unitary Marxist–Leninist one-party socialist republic’ form of government? Exactly zero.
I truly do not understand how you can live in, quite literally, the freest country on the face of the planet in the history of the planet, and hate it so much that you want to destroy it. I truly do not understand why these people simply don’t get on a boat, plane, train, or simply drive to the border, turn in their passport, renounce their citizenship and try to make a living in a place like North Korea, China, Russia, Cuba, Venezuela, or some select Middle Eastern countries. The reason they don’t is simple. They know that they can say and do the most ridiculous, inane, cancerous, vitriolic, and destructive horse manure and they’ll remain free to continue their antics. If they were to try ANY of these things in any of the countries/regions noted, if they weren’t detained as a spy upon entry, they would surely be detained and/or ‘disappeared’ for their vocal opposition to the government. Free choice, free will, free expression, etc. does not exist in these countries and our benevolent leaders on Pennsylvania Avenue, and those skulking the halls of Congress, are to busy trying to turn our country in to one of these disasters. They are to busy granting interviews espousing the merits of socialism and wantonly ignoring the active protests in these countries to see that these people need acknowledgement at a minimum and help to accomplish the worthy goal of trying to be free.
Here’s a video showing what appreciation a visitor from Cuba had for the things we take for granted. And here’s the article that inspired me to post this blog entry: Western Journal.
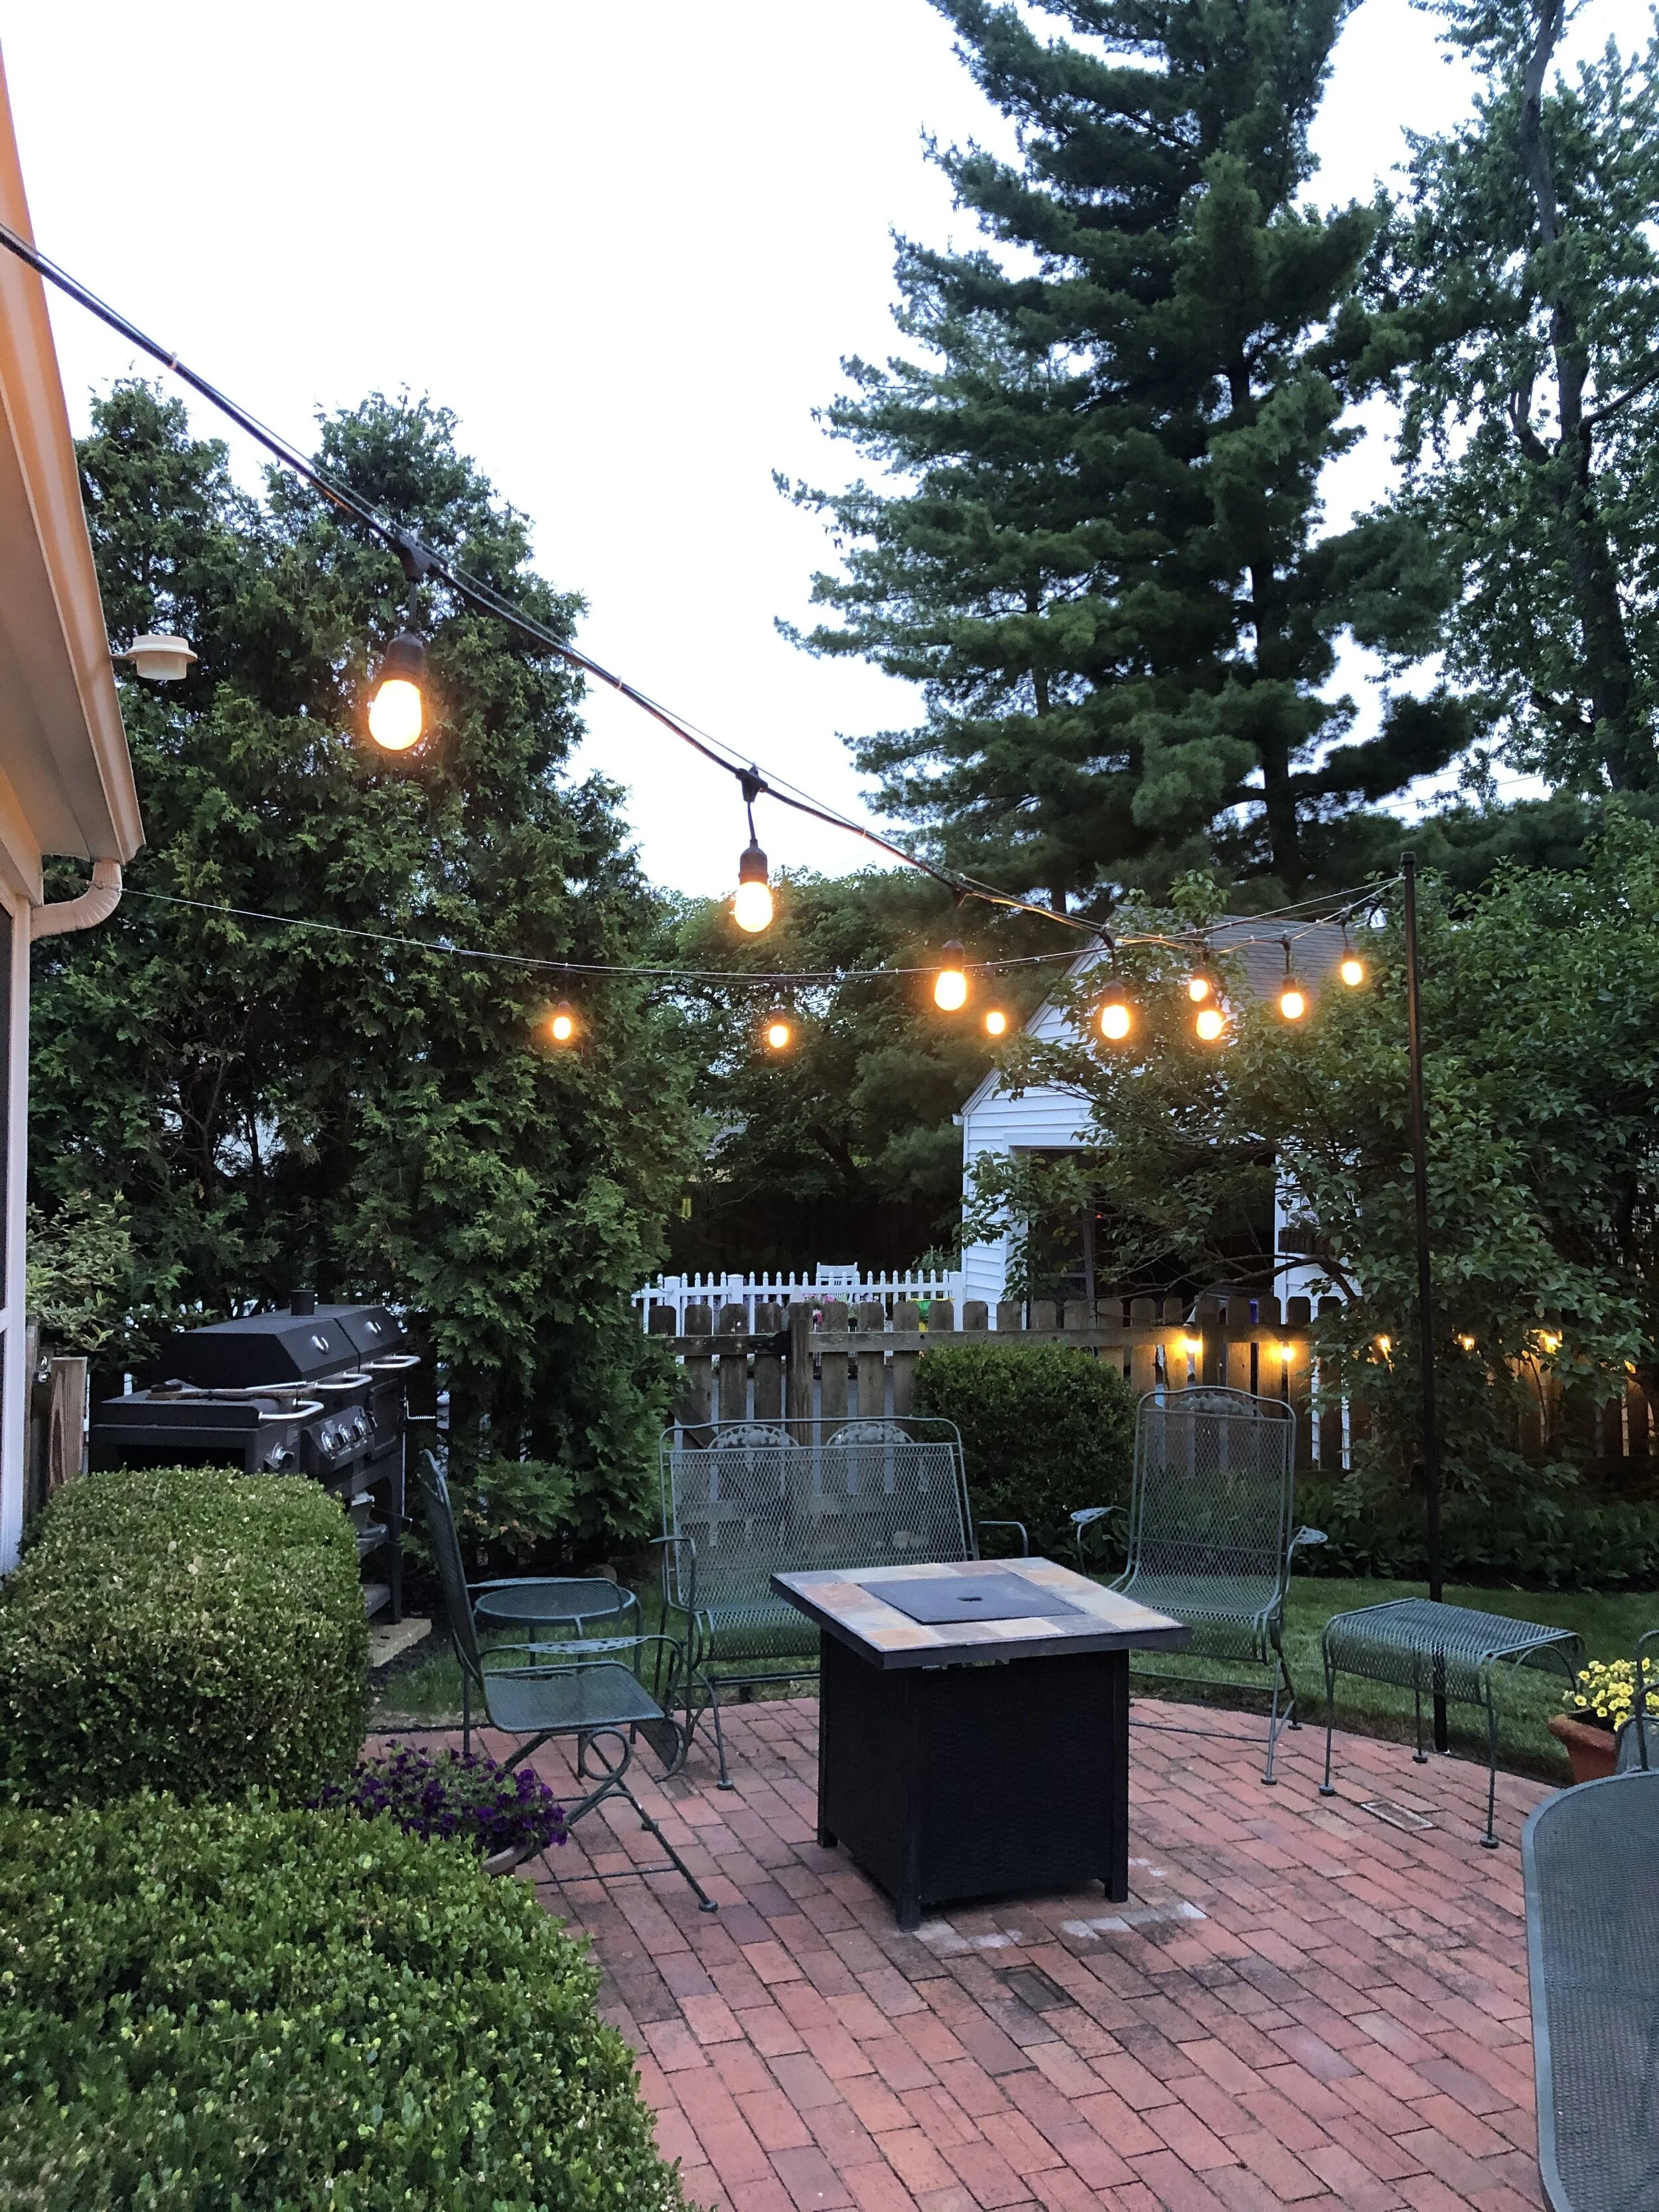
Patio Lights
I normally wouldn’t post something like this because it’s really not in the preparedness vein but hey… you should enjoy life and your surroundings too, right?
Anyhoo, we received three 25’ stings of patio lights from a friend who was shutting down one of his restaurant locations due to COViD. Two of the three strings went on the back privacy fence and they add a surprising bit of ambiance to the backyard.


The third string was placed around the screened in porch but it always looked tacky and I hated it.

So, to solve my light problem on the patio I purchased/used the following:
1 10’x1” diameter black galvanized pipe
1 pipe cap
1 2’x1 1/4” diameter pvc pipe
30’ of 3/16 wire
2 wire clamps
2 lag bolt hooks
1 turnbuckle hook
1 eye hook with spring washer and nut
1 can of Rustoleum primer & paint
6 2’ pieces of rebar
Here’s what you do:
Install the pipe cap.
Drill an appropriate sized hole into the galvanized pipe for the eye hook bolt an inch or so below the pipe cap.
Sand the pipe with 60 grit paper then wipe down with a damp cloth and dry it.
Paint the galvanized pipe and allow time to dry.
While the pipe is drying, drive the rebar into the ground to create a hole for the pvc and then remove the rebar.
Slide the pvc into the hole created by the rebar.
Now that the galvanized pipe paint is dry, install the eye hook on the galvanized pipe. Make sure the eye hook is vertical, not horizontal.
Install the two lag bolt hooks on the house at the desire location.
Insert the galvanized pipe into the pvc sleeve in the ground.
Use the wire clamps and create a 1” loop on one end of the 3/16 wire and attached it to one of the lag bolt hooks.
Thread the non-looped end of the wire through the eye hook on the galvanized pipe.
Pull the wire taught toward the second lag bolt hook where the turnbuckle hook will be installed and cut to length, leave 1”-2” of slack.
Create another 1” loop on the other end of the 3/16 wire.
Hang the second loop on the turnbuckle hook and then hang the turnbuckle on the lag bolt hook.
Turn the turnbuckle to tighten.
Use zip ties to hang the lights on the now strung wire.
Here’s what it looks like when you’re finished.


With so many people home due to COViD this is an easy project that you can do for very little cost. I even managed to walk a young inexperienced couple through Lowe’s as they were trying to do the same project.

Garden 2021
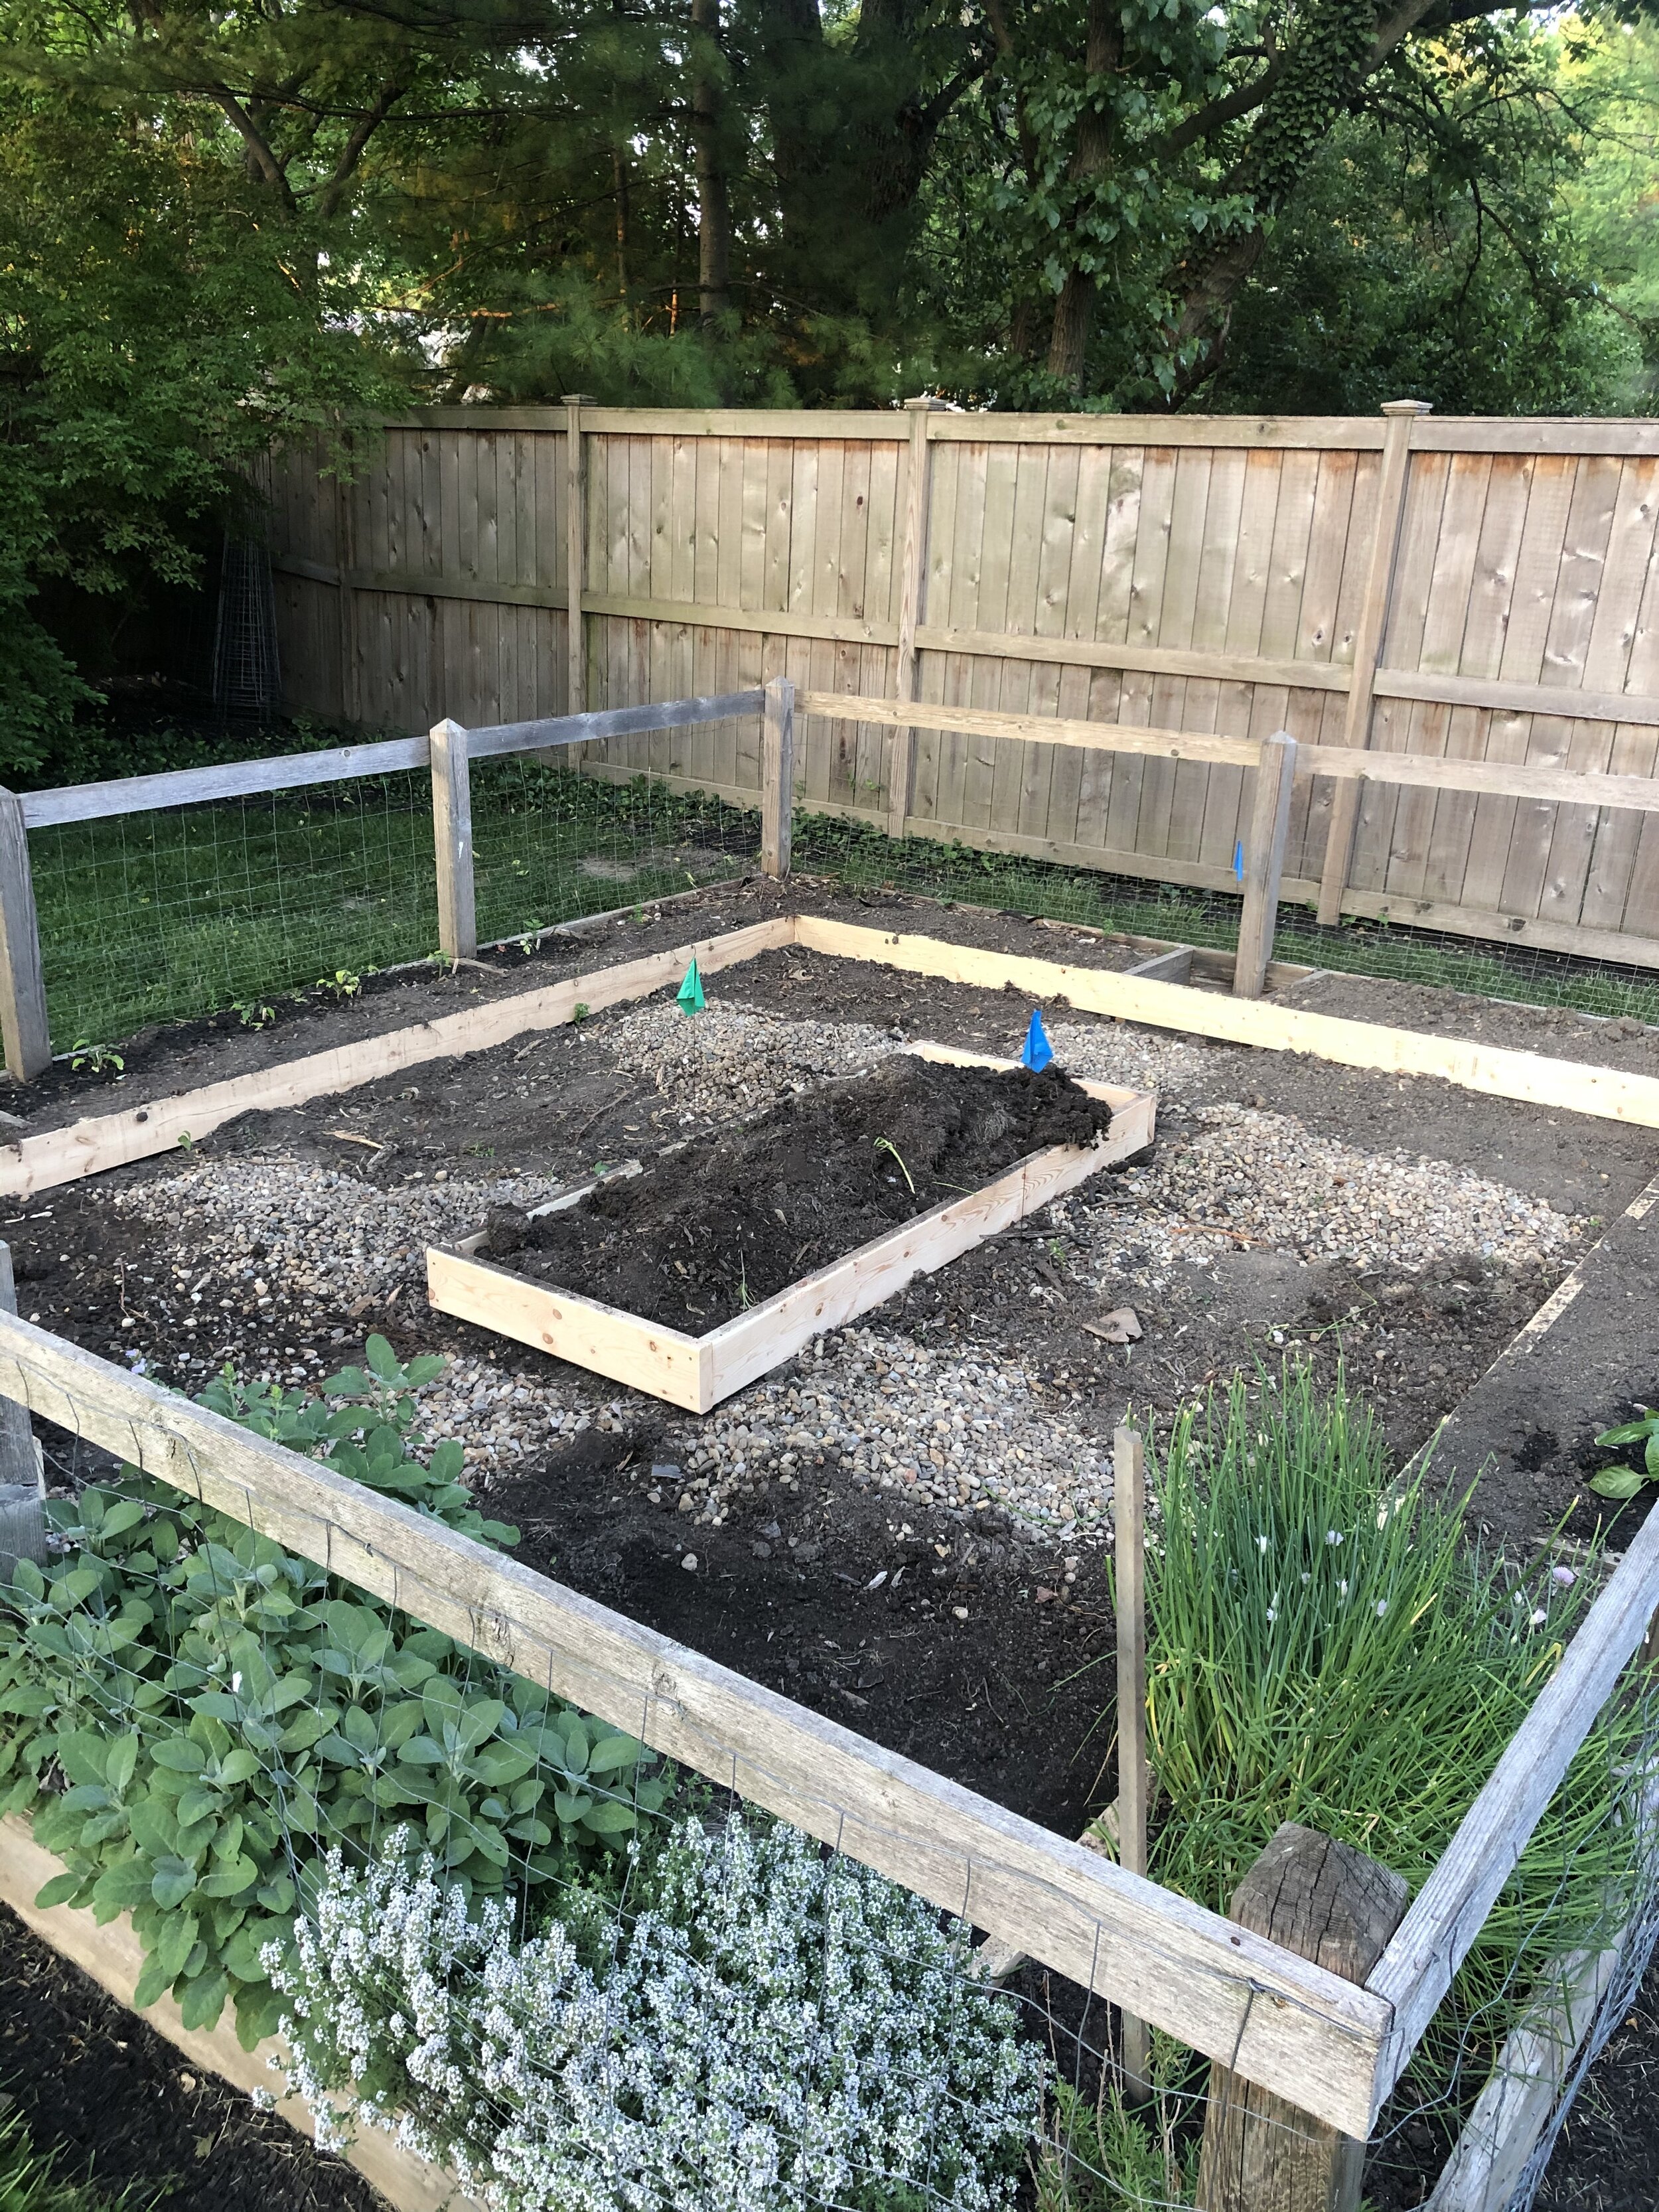
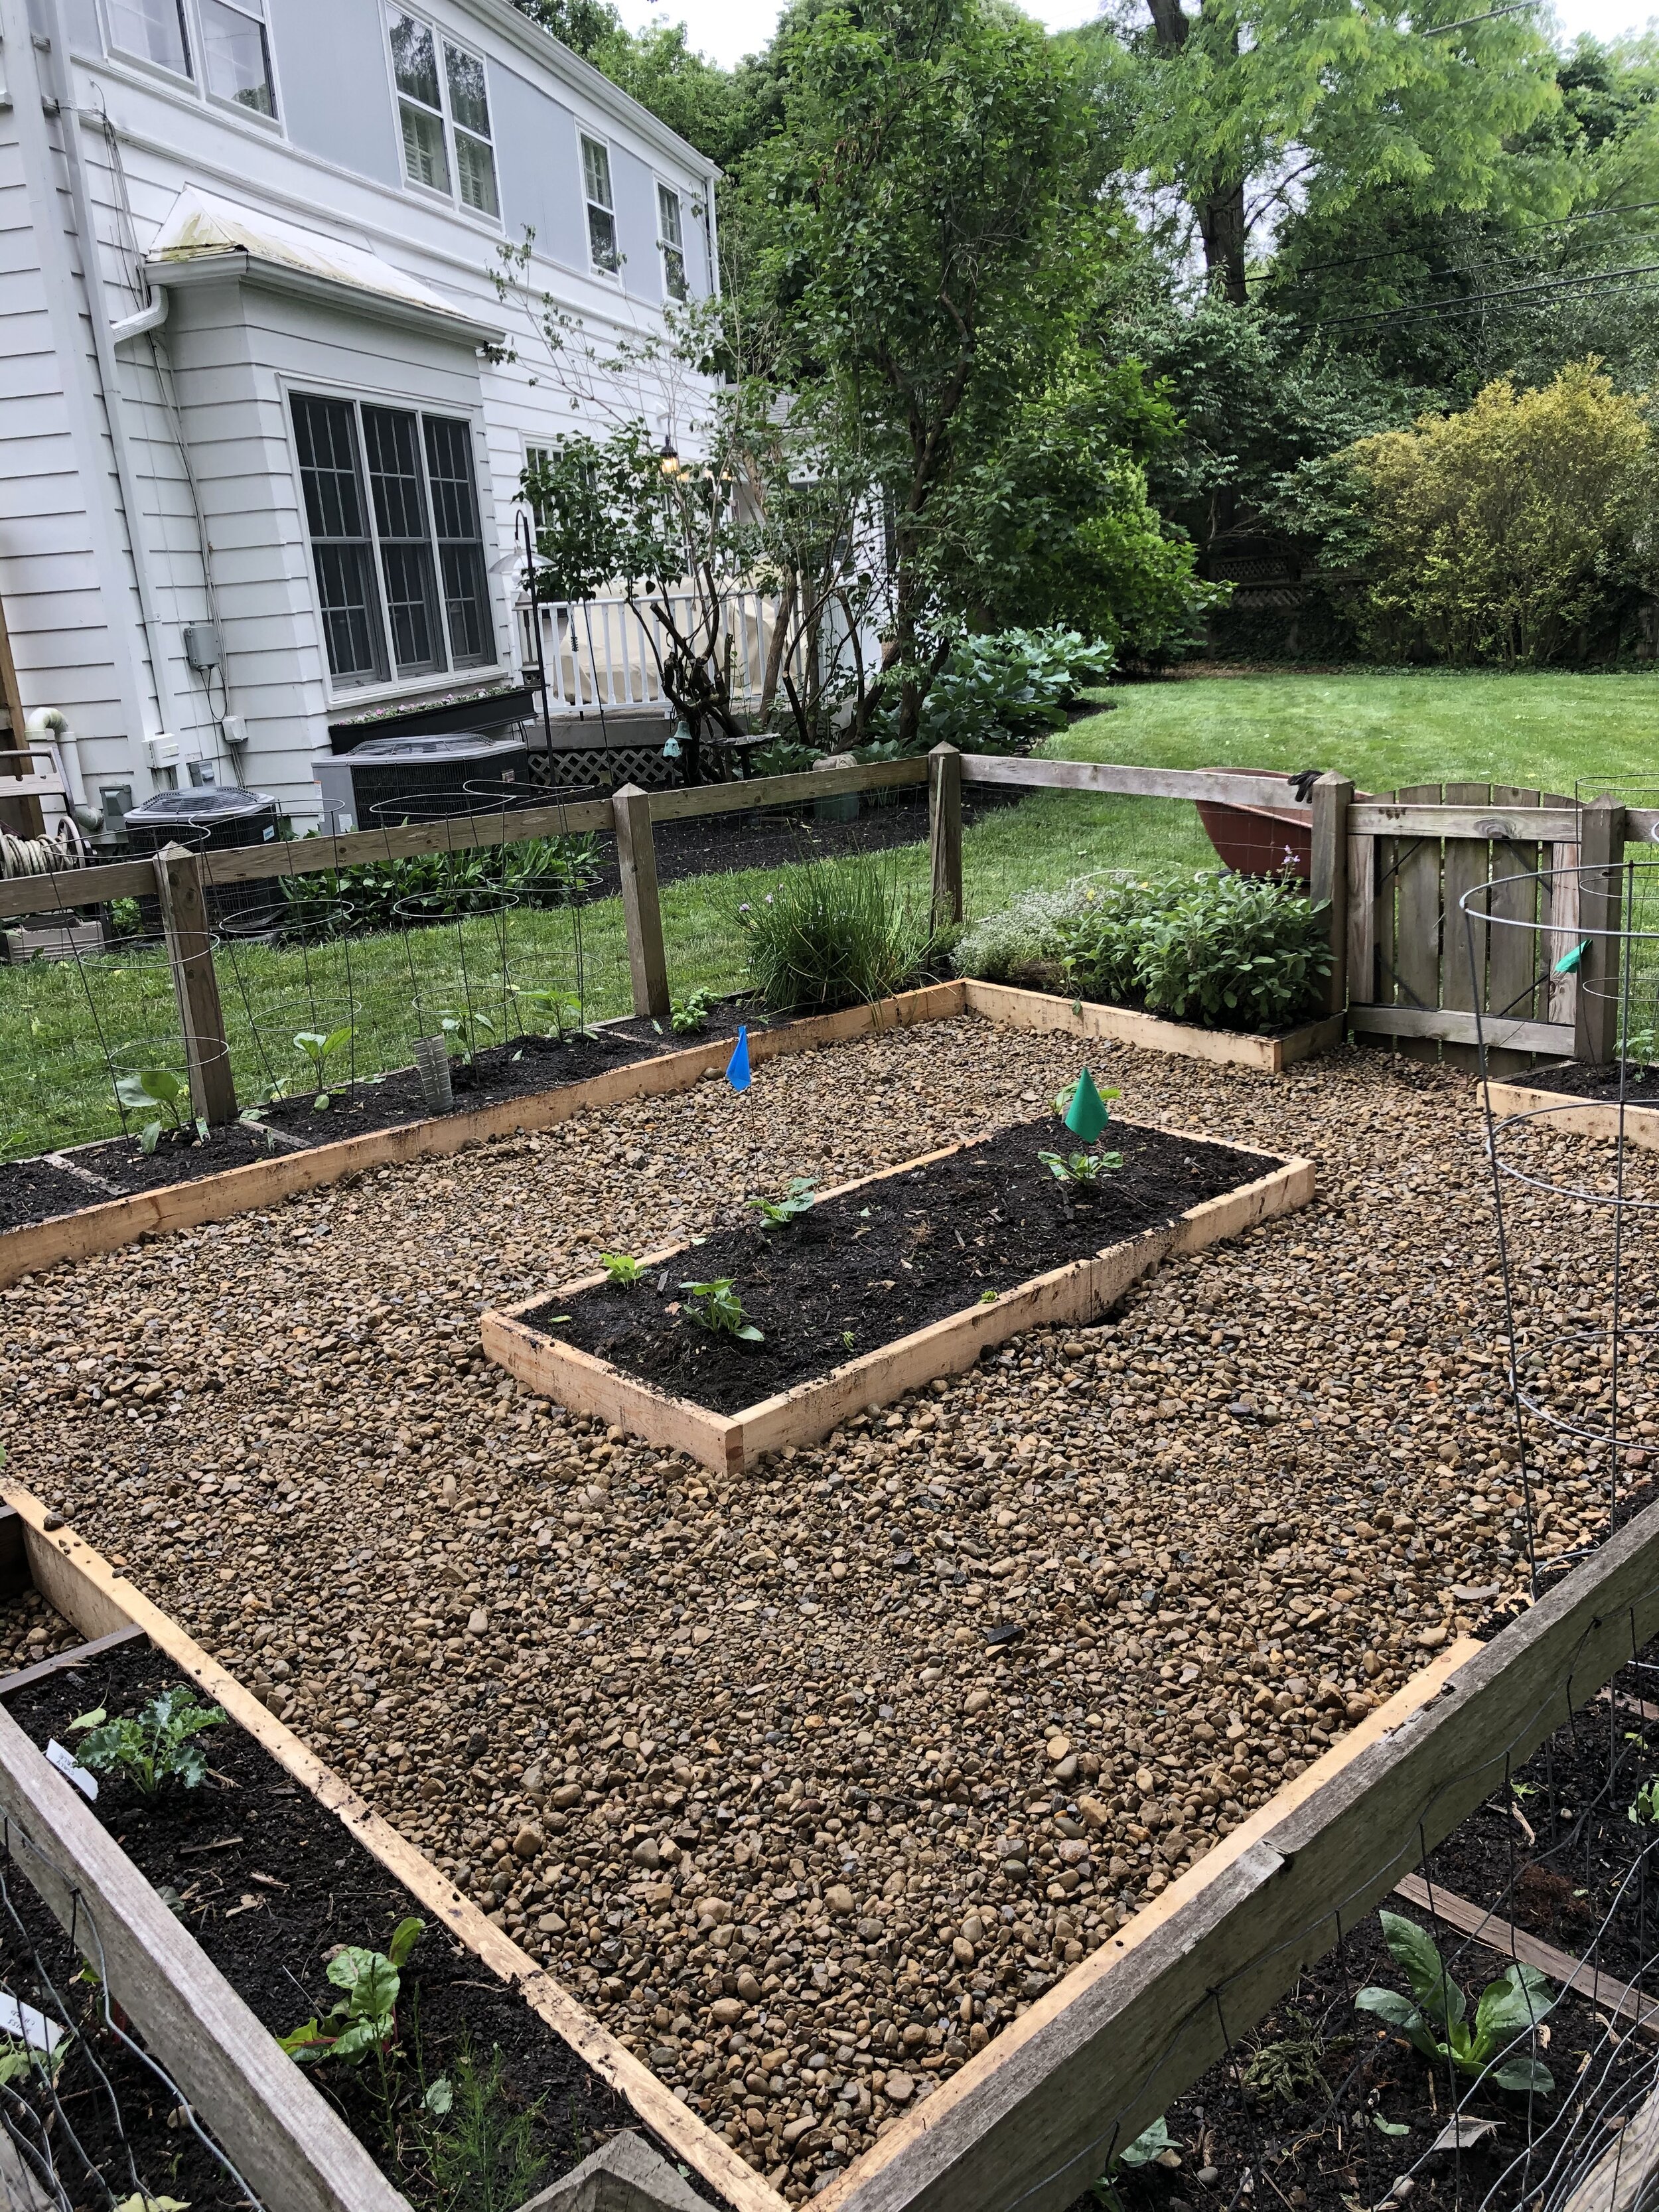
Wow! I finally got the garden in for the 2021 season. I don’t think I’ve worked this hard on the garden since the year I installed it. This is mainly due to not using pressure treated lumber (except the posts) and a number of the 2x8 members needing replacement. On top of that, a request was made to widen the aisles for Gma as her mobility has declined over the years.
As a result of this request, I removed the six large beds which were 4’x6’ and 4’x5’ respectively and replaced them with a single, continuous bed that is only 18” wide around the perimeter. I also lengthened the bed in the middle by two feet. In so doing, I had to move a lot of dirt and rock. Overall, I’d say I physically moved at least 1 ton of dirt and rock (each) over the course of the last several weeks. Knowing that this was the task ahead of me, I started working far earlier than the typical long Memorial Day weekend.
Here are some images of the before, during , and after.
BEFORE


DURING

AFTER

As for what was planted, I still managed to get everything into the garden that I typically plant. It is always more than enough for the family. I did add some things that I haven’t tried before namely the various “salad bar” crops (spinach, romaine, chard, and kale) but I’m lacking the garlic crop this year as the cloves didn’t survive winter and/or were stolen by ambitious squirrels or chipmunks.
2021 Planting:
Tomato
1 Cherry
2 Roma
3 Beefsteak
1 Marina
3 Glacier
1 Black Russian
Salad Bar Crops
2 Spinach
2 Red Romaine
2 Swiss Chard
2 Curly Kale
3 Butternut Squash
2 Yellow Squash
2 Zucchini
3 Cantaloupe
Cucumbers
2 Pickling
2 Heirloom Straight Long
2 Eggplant
4 Green Pepper
2 Basil
Existing Perennials:
1 Chive
1 Rosemary
1 Oregano
1 Sage
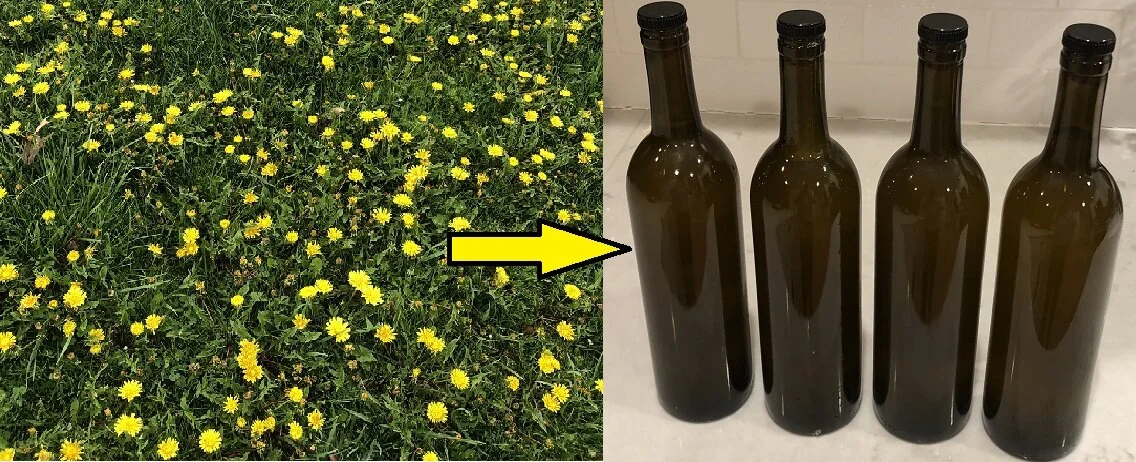
Made Me Some Wine!
Well, it took a week, and it wasn’t nearly as ‘labor intensive’ as the maple syrup, but I finally finished the dandelion wine making process. Here are my first impressions:
Making wine takes time. You spend most of that time watching and waiting and letting things soak and stew and ferment. All you can do is make sure you’ve read the directions correctly and are doing each of the steps completely.
Some of the steps that you undertake on a given day can take hours to complete. For example, Step 8 (see below) says to cook the strained liquid for 30-60 minutes with sugar and rinds. There’s an hour or so right there. Step 10 (see below) says to let the heated liquid cool to blood temperature (~ 98-100-degrees). There’s another hour or so. Do not put off certain steps until 8:00-9:00 pm and think you’re going to be in bed an hour. Because you won’t.
Be prepared for the smell. As I was performing Step 8, cooking the strained liquid with sugar and rinds, I literally woke up my wife at 11:30 pm with the stench! Legit. Out of no where, I hear this barked order, “Turn on the fan! Open a window!”
5 quarts of water, after being boiled twice, reduces in volume to about 3 1/2 -4 Q so I didn’t get six bottles of wine, but rather four.
If I had it to do over again, I would a.) use a bigger funnel, and b.) not use coffee filters to strain the final product as I was bottling. In the end, I couldn’t do anything about the funnel as it was the only one I had. However, once I sacrificed some more of my thin t-shirt to strain the liquid as I was bottling, things went a lot smoother and faster.
Here’s a complete video of the process:
And here’s the complete recipe I undertook as documented in my non-fiction book Home Remedies, Poultice, Salves & Tinctures:
Dandelion Wine
Treatments:
Liver function and maintenance.
Ingredients:
3-5 Q Dandelion Blossoms
5 Q Water
3 lbs Sugar
1 Orange + rind from avg sized orange (organic only, omit if not)
1 Lemon + rind from avg sized lemon (organic only, omit if not)
1 pkg (8 g) live yeast
Whole Wheat Bread
Instructions:
Find a field of dandelions in bloom. (Hint: follow the bees).
Pick dandelions with a sweeping motion of your parted fingers, like a comb (leave green sepals, discard stalks).
Put the blossoms immediately into a large crock-pot/glass mixing bowl/plastic container.
Boil the water and then pour it over flowers.
Cover your crock/bowl/container with cheesecloth.
Stir daily for three days.
On the fourth day, strain blossoms from liquid.
Cook strained liquid with sugar and rinds for 30-60 minutes.
Return the cooked liquid to the crock/bowl/container and add citrus juice.
When liquid has cooled to blood temperature, soften yeast, spread on toast, and float toast in crock/bowl/container.
Cover and let the yeast work for two days.
After two days, strain the liquid again.
Return strained liquid to the crock/bowl/container for one day and allow it to settle again.
Filter into very clean bottles and cork lightly.
Don't drink until winter solstice.
Notes:
A week of work yields a drink that’s good for your liver, as well.

Dandelion Wine Time
Ok, folks. Today’s the day. Today I’ll be starting the process of making Dandelion Wine. I’ve got my container in hand and my wine bottles are on order and should be here tomorrow. All told, it’s a week long process of stirring, boiling, straining, and waiting. Wish me luck!
Here’s how I’m approaching this endeavor.
Dandelions: My wife has pointed me to a field near her school with her highest recommendation as her school district is pesticide free. That’s a good thing people.
Container: I chose the size container I did based purely on math. The recipe calls for 3-5 quarts of dandelions and 5 quarts of water. As I result of the water and displacement from the dandelions, I knew I needed something bigger than what I current had on hand. I won’t be repeating the same silly mistakes I made when I did maple syrup! So, I bought a 12 quart food grade container. It was promptly washed when it arrived last week.
Wine Bottles: Basically, I did the math on how much wine will be produced by reviewing the recipe which calls for 5 quarts (Q) of water. It wasn’t difficult math, mind you, as this English major was able to deduce the capacity needed. To be clear, though, I needed to do this math (and the conversion) because the wine bottle capacity is measured in milliliters (ml) while the recipe is denoted in quarts. For you other English majors out there, here’s the math:
5 Q water is equal to 4.73176 L
4.73176 L is equal to 4731.76 ml (just slide the decimal, baby)
4731.76 ml divided by the 750 ml wine bottle capacity is 6.31
6.31 is the number of wine bottles needed to bottle and age the dandelion wine
Simple.
Look for my post next weekend where I’ll detail out the process and include the video.
Maple Sap Process - Video
As promised, I finally got iMovie to work and play nice in order to cobble together the dozen or so 30-second and 1-minute videos I took during the maple syrup making process. You can watch that here:
For some reason I kept calling my 2-gallon maple sap collection bucket a 3-gallon bucket. It’s not. It’s only 2-gallons. Also, I think I mis-stated the temperature that the sap needs to achieve in order to become maple syrup. That temperature is 219-degrees. Some syrup producers vary their temperature to get it to 220 or 221-degrees but it needs to at least reach 219-degrees.

Quail Hunting Trip
Originally, I was just going to to go camping on my friend’s property and try out some primitive skills I’d been reading about. To do this, I was going to drive and bring a bunch of gear. A few days (maybe a week) before I was to depart, those plans changed. Now I was going to be quail hunting at a private duck hunting club out on the coast on North Carolina. Due to the timetables involved around some of the activities associated with the quail hunt, I was now going to be flying instead of driving.
Driving to my friend’s property is 20 hours round trip. Driving to the duck hunting property on the coast is 26 hours round trip. Umm, what time is that flight again?
If I’ve learned anything from 2020 and this pandemic and all of the restrictions to my basic freedoms, it’s patience and flexibility.
So, I flew down Wednesday evening, got about four hours of sleep before my friend awoke me at 2:30 AM with the decree, “Dave, time to get it.” We we’re on the road by 3:00 AM to make the three hour drive from his place to the coast. From there, we met some friends of his who took us out past Harker’s Island for some salt water fishing. Here are some pictures from that adventure. I’d also like it noted for the record that he stole that Albacore from me.

Sunrise from the dock

Sunrise from the boat while heading out
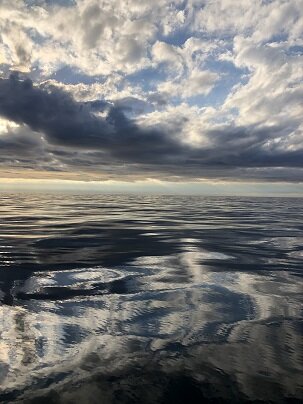
Ocean was like glass that morning

This is the Harker’s Island lighthouse


From there was used the clubs fresh water impoundments to do a lot of large mouth bass fishing.
Friday and Saturday we went out in three separate groups to do some quail hunting. Each group had their own dog and handler. The club has a quail pen so we’d go in and box up 15 or so birds for each group and then the handlers would go and disperse them in the fields for the dogs to find. It’s a very cyclical thing to quail hunt this way. The club raises their own quail, the members and guests use the quail to maintain the shooting skills when it’s not duck season, the dogs and the trainers are utilized to maintain their skills as well. Then the members and guests eat the quail. Circle of life, baby.
Here’s what one of the fields looks like before all of the shooting starts.
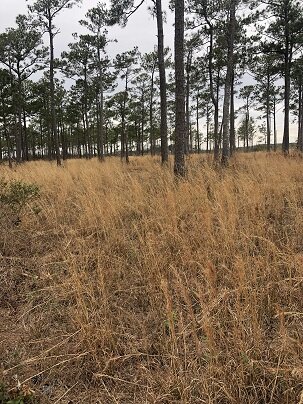
The club maintains several fields like this and there’s sorghum and millet and corn around for those that escape justice. The bush hog runs through the area several times a year to main the trails while leaving mini hedgerows for the birds to rest and nest in if we don’t manage to find them. The dogs are pretty good and we manage to find about 95% of them. The problem with birds and hunting like this is that they tend to walk off after they’ve been placed by the dog handlers. Most don’t, but some do.
Evenings were spent by this massive fire pit that measures about 3.5’ - 4’ in diameter just watching in silence over a cigar and a bourbon as the sun slips below the horizon off the point.


All in all, it was a great trip. I was able to relax and unwind and shake off this COViD funk. For a little while at least. My plan for next year, because I’ve already received an invite for that trip, is to just take the week off. I’ll drive down several days early and do some camping along the New River off the backside of my buddies property and then head to the coast.

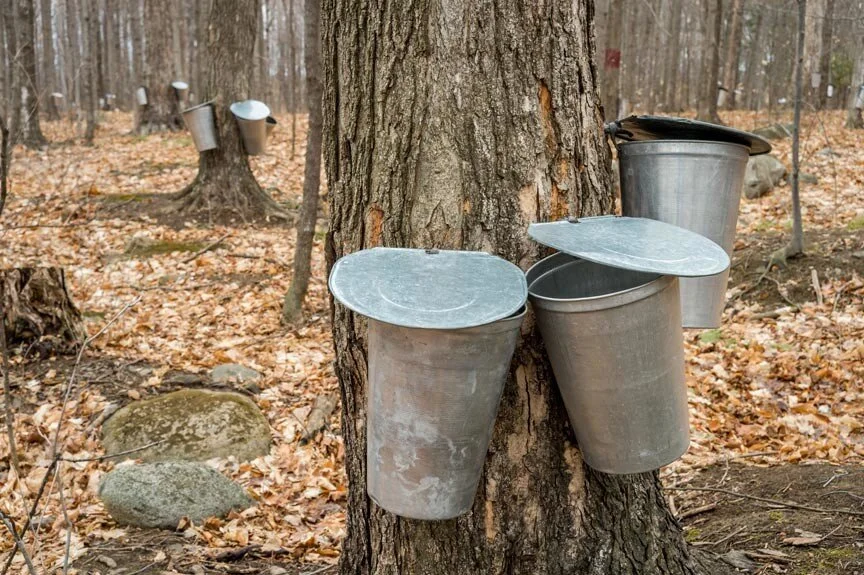
Making Maple Syrup
Well, I (we) finally did it! We successfully made maple syrup using sap from our backyard maple tree.
To be honest, all-in-all, it was a fairly simple, easy, and straight forward process. It was literally as easy as:
Collect sap.
Cook sap.
Bottle sap.
However, what people don’t tell you when they say, “Oh, making maple syrup is easy!” is the sheer amount of time and sap needed to make one bottle of maple syrup!
Seriously, I started with a full 2-gallon bucket of maple sap and ended up with 1/3 of a pint of maple syrup.

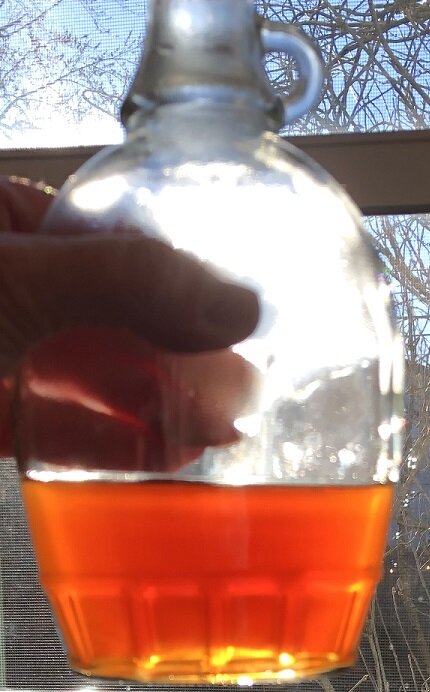
It took us four hours to cook down that 2-gallons of sap into what you see above (~ 1/3 pint).
I recorded a lot of what I (we) did throughout the time consuming process and cobbled it all together in a video (which I’ll post tonight or tomorrow). There is one thing that was not recorded and that was where the roasting pan I attempted to use (plan B) fell out of, or off of, the grilling grate thereby spilling about 1/3 of a gallon of precious maple sap! This resulted in Plan C, the cast iron pot.
So what did we learn during this process?
Collect more sap. This means using more than one pot to cook it down to speed up the process.
Verify that the pot you’re going to use fits the device being utilized. I started with Plan A - turkey frying pot (too big). Then I went to Plan B - aluminum turkey roasting pan (too unstable). I eventually landed on Plan C - cast iron pot (just right))
Have a second pot (or third pot if using two pots to cook down the sap) identified and ready for finishing.
The more sap you collect the longer the process takes. This means more time, more firewood, and possibly more pots. So start early in the morning not at 1:30 in the afternoon.
All things being equal, it was a fun and rewarding experience and I’m glad we did it.
Look for that video announcement soon!
Maple Harvest Time... Almost
The wife and I went to visit our daughter at college last weekend (shhhh the campus is on lockdown and visitors are not allowed). Anyhoo… in years past, when we’ve made trips along a similar route during mid to late February, the hills and hollers were full of campfires choking the interstate with smoke as the maple sap was cooked down into syrup. During this most recent trip though, there wasn’t a smoke signal to be found.
The reason the cookers aren’t running is entirely due to the conditions here on the ground. Frankly speaking, the weather sucks and it’s not conducive to making maple syrup. There’s a foot of snow still on the ground and the daytime highs (20’s maybe 30’s on occasion) and nighttime lows (teens most nights recently) are still too cold for the sap to run freely. Now we have a ton of ice and additional snow on top of what we already had. Good times.
If this is something that interests you, here are the conditions needed for maple syrup production:
Daytime highs of 40-degrees or better
Nighttime lows can be in the 20-degree range
10-gallons of sap is ~ 1 quart of syrup once it is cooked down
I’ve been itching to make my own maple syrup since 2019 when I first kinda sorta tried my hand at it. Long story short, I didn’t make it past the collection step. Here’s why: Maple Sap Went Bad.
Now that all of my books are published and I’m taking a much needed break from writing, I’m going to be doing some of the things I’ve wanted to try (Dandelion Wine among other things) or fun projects and skills tests that I previously succeeded at and/or tried and failed.
New Interview Available
Well folks… I’m back on the airwaves with a new interview!
On Saturday (02/13/2021), I was interviewed by John Jeffers over on the Contra Radio Network. This is my second interview with John and, to be honest, he was my first call when I decided to do podcasts interviews again.
In a nutshell, we talk about a lot of stuff and, after having listened to the production just this morning, I think you’ll laugh, chuckle, cringe, and nod your head to a great many things we had to say. We talk about my books, obviously, but we also delve into some detail regarding the genesis for my books and preparedness in general. There’s a fair amount of time spent on politics, the election, the woke mob, current events, and more.
I’ve posted links to the interview from a number of podcasts sites where the Contra Radio Network is available on the My Works - Interview page.